Data storage
In the previous section, we started implementing our business logic in a Lambda function, but what's a CRUD application without data storage? So our next task is tackling how we will store the classified ads that our users create via the chatbot. Our database of choice is going to be Amazon DynamoDB.
Introducing Amazon DynamoDB
Amazon DynamoDB is a fully managed, serverless, key-value NoSQL database designed to run high-performance applications at any scale.
Terraform: DyanamoDB
Create a new file dynamodb.tf in the root of your project and add the following:
resource "aws_dynamodb_table" "classifieds" {
  name           = "Classifieds"
  read_capacity  = 20
  write_capacity = 20
  # Controls how you are charged for read
  # and write throughput and how you manage capacity.
  billing_mode = "PROVISIONED"
  hash_key     = "PostId"

  attribute {
    name = "PostId"
    type = "S"
  }
}
We have declared a DynamoDB table named Classifieds. We will use provisioned billing mode, so we need the read and write capacity specified ahead of time. Our hash key is going to be the post identifier PostId. Since this is a NoSQL database, we don't necessarily have to specify additional attributes like PostTitle and PostDescription.
We will revisit DynamoDB in detail later on, and this is not our final structure in terms of keys. DynamoDB requires enough thought on access patterns to be efficient. So we will have another section where we go over our access patterns.
You can run terraform plan to see what will be provisioned. You should see an output similar to below.
Terraform used the selected providers to generate the following execution plan. Resource actions are
indicated with the following symbols:
  + create

Terraform will perform the following actions:

  # aws_dynamodb_table.classifieds will be created
  + resource "aws_dynamodb_table" "classifieds" {
      + arn              = (known after apply)
      + billing_mode     = "PROVISIONED"
      + hash_key         = "PostId"
      + id               = (known after apply)
      + name             = "Classifieds"
      + read_capacity    = 20
      + stream_arn       = (known after apply)
      + stream_label     = (known after apply)
      + stream_view_type = (known after apply)
      + tags_all         = (known after apply)
      + write_capacity   = 20

      + attribute {
          + name = "PostId"
          + type = "S"
        }

      + point_in_time_recovery {
          + enabled = (known after apply)
        }

      + server_side_encryption {
          + enabled     = (known after apply)
          + kms_key_arn = (known after apply)
        }

      + ttl {
          + attribute_name = (known after apply)
          + enabled        = (known after apply)
        }
    }

Plan: 1 to add, 0 to change, 0 to destroy
We don't have to provision the table just yet. So let's work on implementing our Lex intents one by one.
CreatePost
'use strict';

const AWS = require('aws-sdk');
const dynamodb = new AWS.DynamoDB.DocumentClient();
const TABLE_NAME = 'Classifieds'
const CREATE_POST_INTENT = 'CreatePost'

// Payload that we construct from intent slots
var payload = {}

// Close dialog with the user, reporting fulfillmentState of Failed or Fulfilled
function close(sessionAttributes, fulfillmentState, message) {
    return {
        sessionAttributes,
        dialogAction: {
            type: 'Close',
            fulfillmentState,
            message,
        },
    };
}

// --------------- Intents -----------------------
async function createPost(intentRequest, context, callback) {
    const slots = intentRequest.currentIntent.slots;
    const title = slots.PostTitle;
    const description = slots.PostDescription;

    payload = {
        PostId: context.awsRequestId,
        // we will update this to a real userId once we implement Cognito
        UserId: `${intentRequest.userId}`,
        PostTitle: title,
        PostDescription: description
    };
    await dynamodb
        .put({
            TableName: TABLE_NAME,
            Item: payload
        })
        .promise();
}

// --------------- Events -----------------------
function dispatch(intentRequest, context, callback) {
    const intentName = intentRequest.currentIntent.name;
    // ...

    switch (intentName) {
        case CREATE_POST_INTENT:
            createPost(intentRequest, context)
            break;
        default:
            throw new Error(`Intent with name ${intentName} not supported`);
    }

    // ...
}

// --------------- Main handler -----------------------

// ...
You can now run terraform apply to provision your resources. After provisioning the resources and testing the CreatePost intent, you will get an error. You can check CloudWatch logs and will notice the following error:
"reason":{"errorType":"AccessDeniedException","errorMessage":"User:
arn:aws:sts::xxxxxxxxxx:assumed-role/iam_for_classifieds_lambda/classifieds_lambda
is not authorized to perform: dynamodb:PutItem
on resource: arn:aws:dynamodb:us-east-1:xxxxxxxxxx:table/Classifieds"...
By now, we know the drill. We must give our Lambda function permission to perform actions on our DynamoDB table.
Update lambda.tf and add the following code block at the end of the file.
// ...

# We need to grant Lambda Dynamodb permissions
# So let's create an iam policy that allows operations on dynamodb
# Here we have specified all actions, however,
# it is recommended to specify only the required actions
data "aws_iam_policy_document" "allow_dynamodb" {
  statement {
    sid       = ""
    effect    = "Allow"
    actions   = [
        "dynamodb:PutItem"
    ]
    resources = ["*"]
  }
}

# Use the defined iam policy document to create an iam policy that allows dynamodb access
resource "aws_iam_policy" "allow_dynamodb" {
  name        = "allow-dynamodb-policy"
  description = "Allows access to dynamo db"
  policy      = data.aws_iam_policy_document.allow_dynamodb.json
}

# Now that we have an iam policy, let's attach it to our lambda iam role
resource "aws_iam_role_policy_attachment" "allow_dynamodb_attach" {
  role       = aws_iam_role.iam_for_classifieds_lambda.name
  policy_arn = aws_iam_policy.allow_dynamodb.arn
}
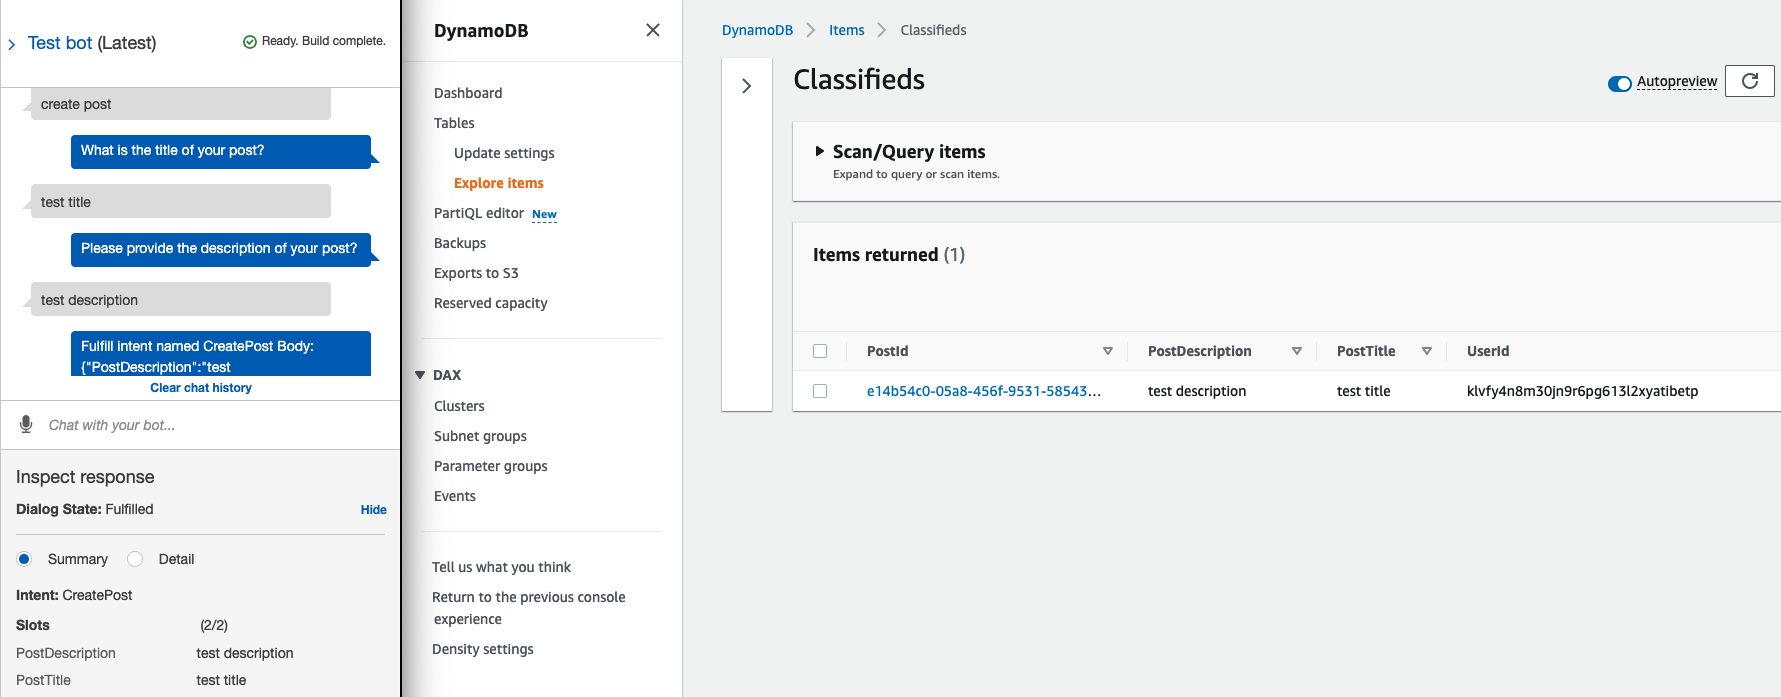
You can test the bot again, and your post should be created and stored in DynamoDB.
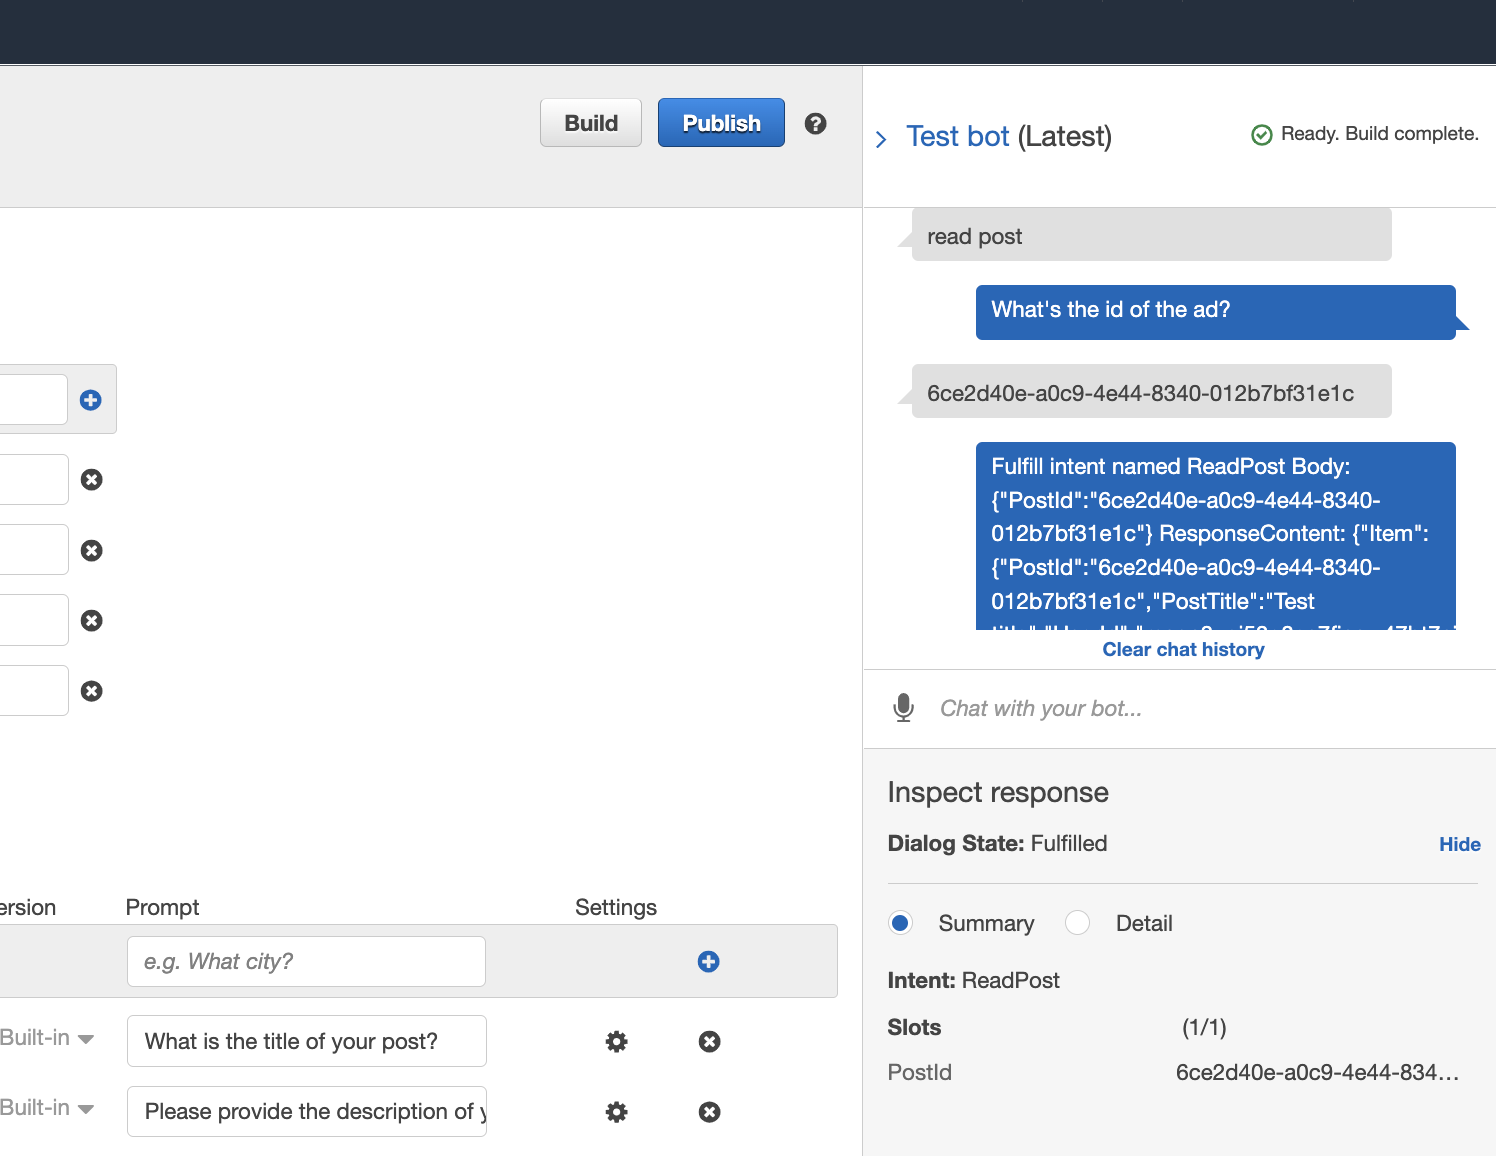
ReadPost
Let's work on the logic to read a post from our database. First, we will need to parse a PostId to our chatbot, which will return a post for us. Add logic to handle ReadPost intent as below.
'use strict';

// ...

const READ_POST_INTENT = 'ReadPost'

// ...

async function readPost(intentRequest, callback) {
    const slots = intentRequest.currentIntent.slots;

    var params = {
        TableName: TABLE_NAME,
        Key: {
            PostId: slots.PostId
        }
    };

    try {
        const result = await dynamodb.get(params).promise()
        return result;
    } catch (error) {
        console.error(error);
    }
}

// --------------- Events -----------------------
async function dispatch(intentRequest, context, callback) {
    const intentName = intentRequest.currentIntent.name;

    // ...

    // will store our response contet to be sent back to Lex
    let responseContent = ''

    switch (intentName) {
        case CREATE_POST_INTENT:
            createPost(intentRequest, context)
            break;
        case READ_POST_INTENT:
            responseContent = await readPost(intentRequest);
            break;
        default:
            throw new Error(`Intent with name ${intentName} not supported`);
    }

    if (source !== 'DialogCodeHook') {
        callback(
            close(
                sessionAttributes,
                'Fulfilled',
                {
                    'contentType': 'PlainText',
                    'content': `Fulfill intent named ${intentName}
                    ResponseContent: ${JSON.stringify(responseContent)}`
                }
            )
        );
    }
}
Apply your changes by running terraform apply.
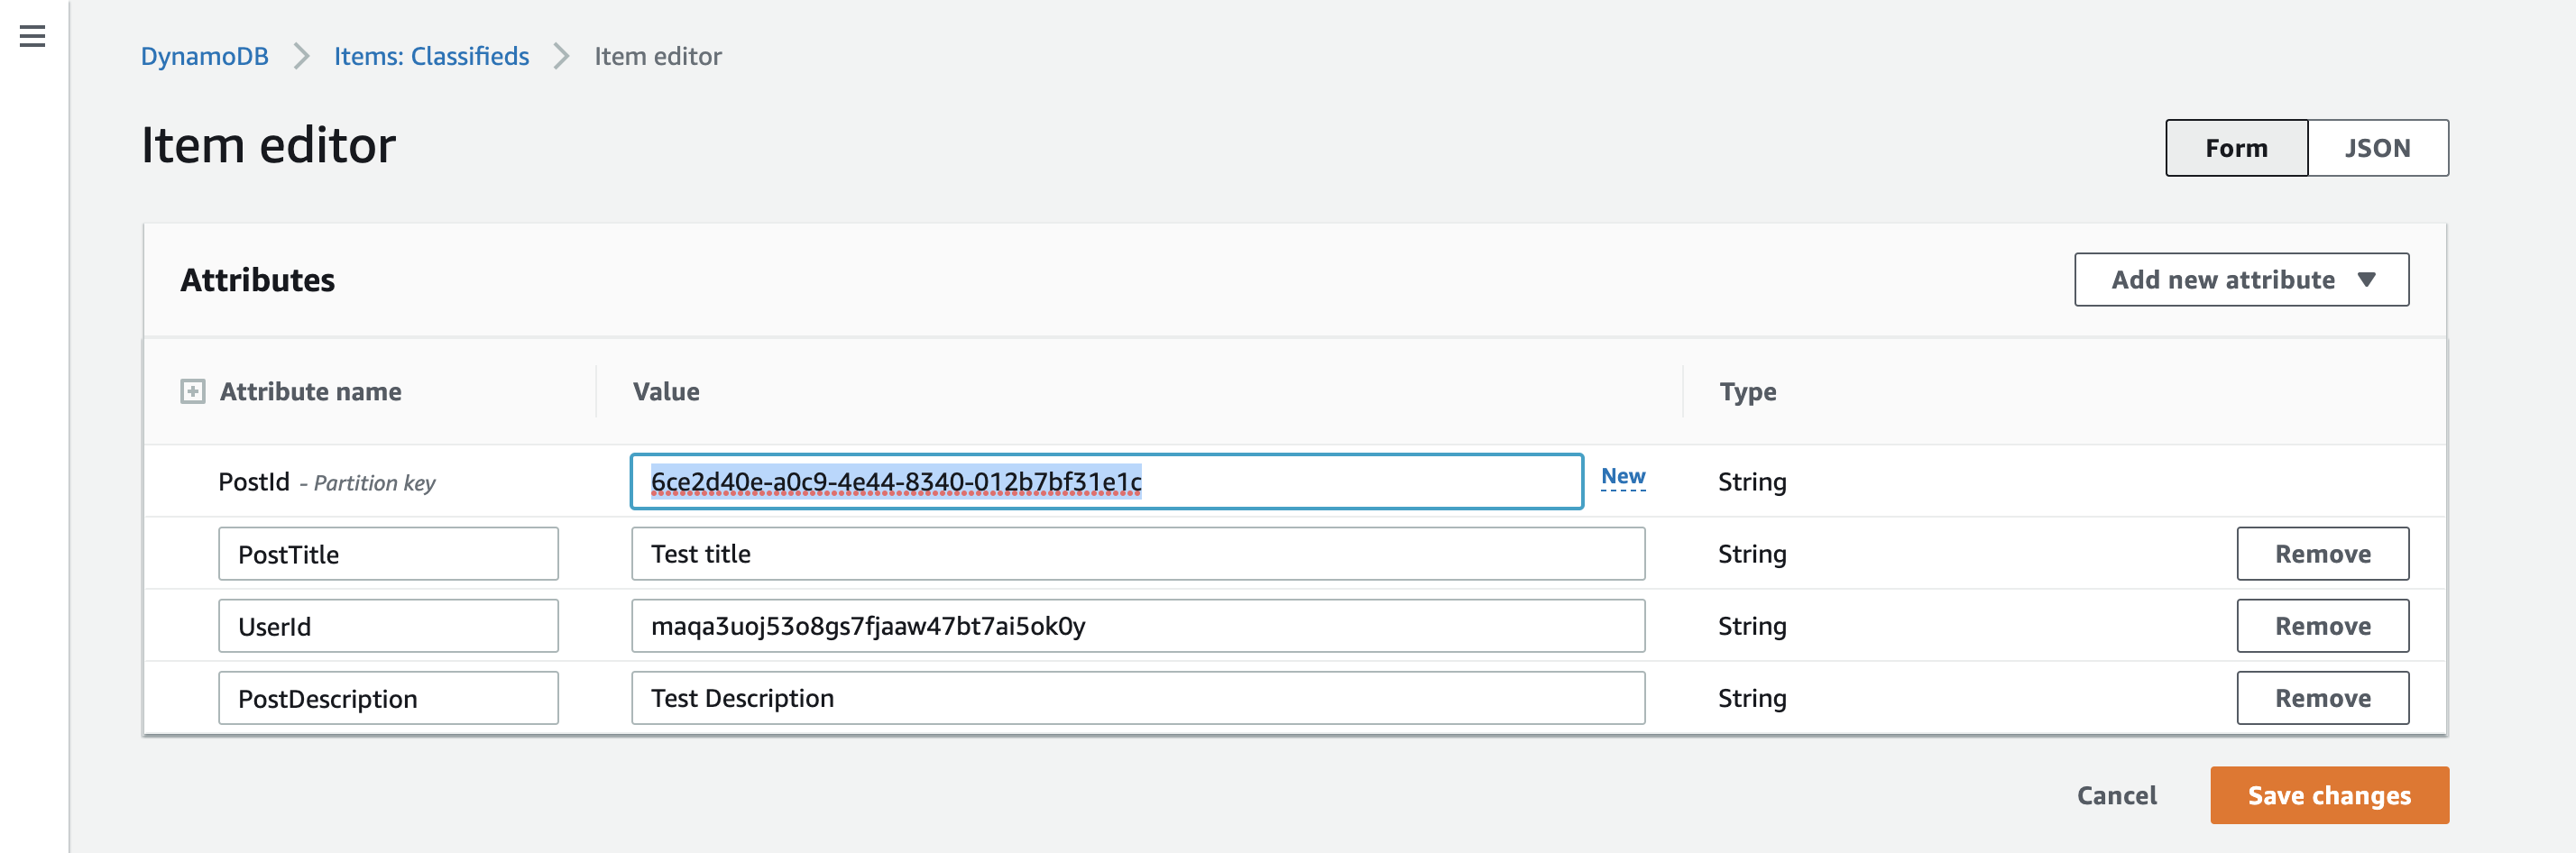
Go ahead and create a new post using the Lex test window. Then, navigate to DynamoDB and copy the created item's PostId. This process will use the scan process to return the items in the table.
WARNING
DynamoDB scans are expensive and slow. It's not good practice to use scans on your DynamoDB tables
Now, if you test reading a post using the test bot window, you will get an error because Lambda has no DynamoDB GetItem permissions.
Update the data "aws_iam_policy_document" "allow_dynamodb" block in your lambda.tf file to the following.
# We need to grant Lambda Dynamodb permissions
# So let's create an iam policy that allows operations on dynamodb
# Here we have specified all actions, however,
# it is recommended to specify only the required actions
data "aws_iam_policy_document" "allow_dynamodb" {
  statement {
    sid       = ""
    effect    = "Allow"
    actions   = [
        "dynamodb:PutItem",
        "dynamodb:UpdateItem",
        "dynamodb:GetItem",
        "dynamodb:DeleteItem"
    ]
    resources = ["*"]
  }
}
Apply the new IAM policy by running terraform apply.
Test the intent again, and you should see a successful response.
UpdatePost
Next up is the logic for the update intent. For now, we won't worry about authentication and authorization; we will address that later when we look at Amazon Cognito.
Make the following updates to src/classifieds_lambda.js
'use strict';
// ...
const UPDATE_POST_INTENT = 'UpdatePost'

// ...

async function updatePost(intentRequest) {
    const slots = intentRequest.currentIntent.slots;
    payload = {...slots};

    await dynamodb
        .put({
            TableName: TABLE_NAME,
            Item: payload,
        })
        .promise();
}

// --------------- Events -----------------------
async function dispatch(intentRequest, context, callback) {
// ...
    switch (intentName) {
        // ...
        case UPDATE_POST_INTENT:
            responseContent = await updatePost(intentRequest);
            break;
        default:
            throw new Error(`Intent with name ${intentName} not supported`);
    }
}
Apply the changes by running terraform apply. When you try to test the bot, you will notice that after providing the PostId, the intent is fulfilled immediately. The immediate response is because Amazon Lex will not implicitly prompt for slots that are not marked as required. If you look back on our definition of UpdateIntent you will see that we have both slots set as not required. It would not be good for Lex to make assumptions as you may have other cases where you want to ignore the slots.
Let's make updates to check for empty optional slots and prompt the user to provide the information.
    //...
    // will store our response contet to be sent back to Lex
    let responseContent = ''
    let slotToElicit;
    let message;

    switch (intentName) {
        // ...
        case UPDATE_POST_INTENT:
            // check for optional slots and prompt user input
            if (!intentRequest.currentIntent.slots.PostTitle) {
                slotToElicit = 'PostTitle'
                message = 'Enter a new title of your post. Enter 0 to keep existing title.'
                return callback(
                    elicitSlot(sessionAttributes, intentName, slots, slotToElicit, message)
                );
            }

            if (!intentRequest.currentIntent.slots.PostDescription) {
                slotToElicit = 'PostDescription'
                message = 'Enter new description of your post. Enter 0 if you want to keep existing description.'
                return callback(
                    elicitSlot(sessionAttributes, intentName, slots, slotToElicit, message)
                );
            }

            responseContent = await updatePost(intentRequest);
            break;
        default:
            throw new Error(`Intent with name ${intentName} not supported`);
    }

    //...
Apply the changes and test again. You are now prompted to provide the title and description of your post. What if you want to change one slot only? We have added an option to provide a response of zero when we want to maintain existing changes. However, if we try using that option, our attributes are updated with zero values. So let's add checks for that. See highlighted changes next.
async function updatePost(intentRequest) {
    const slots = intentRequest.currentIntent.slots;
    payload = {
        PostId: slots.PostId
    }

    // no updates to make
    if (slots.PostTitle == 0 && slots.PostDescription == 0) {
        return;
    }

    if (slots.PostTitle != 0) {
        payload.PostTitle = slots.PostTitle
    }

    if (slots.PostDescription != 0) {
        payload.PostDescription = slots.PostDescription
    }

    // ...
}
DynamoDb will remove the attribute because we are using a PutItem operation. The PutItem operation completely overwrites an existing Item in the table, meaning if we don't provide the existing attributes, we won't have them after the operation.
Instead, we would like to modify the existing Item and keep other attributes untouched. To achieve this, we will use the UpdateItem operation, which our DynamoDb JavaScript client delegates via its update method. With the UpdateItem operation, we will need to provide an update expression - an update expression specifies how UpdateItem will modify the attributes of an item.
Let's change our lambda function to see how that will look.
async function updatePost(intentRequest) {
    const slots = intentRequest.currentIntent.slots;
    payload = {}
    let updateExpression = `SET`
    let updateExpressionActions = []

    // no updates to make
    if (slots.PostTitle == 0 && slots.PostDescription == 0) {
        return;
    }

    if (slots.PostTitle != 0) {
        payload[`:PostTitle`] = slots.PostTitle
        updateExpressionActions.push(" PostTitle = :PostTitle")
    }

    if (slots.PostDescription != 0) {
        payload[`:PostDescription`] = slots.PostDescription
        updateExpressionActions.push(" PostDescription = :PostDescription")
    }

    let params = {
        TableName: TABLE_NAME,
        Key: {
            PostId: slots.PostId
        },
        // example: SET PostTitle = :PostTitle, PostDescription = :PostDescription
        UpdateExpression: updateExpression + updateExpressionActions.join(", "),
        ExpressionAttributeValues: payload,
        // don't create a new item if it doesn't exist
        ConditionExpression: 'attribute_exists(PostId)',
      };

    await dynamodb
        .update(params)
        .promise();
}
Let's talk about the updates we have made. In our UpdateExpression, we have used SET - an action to add one or more attributes to an item. The new values will overwrite any attributes that already exist.
We have also added a ConditionExpression that checks whether the provided PostId exists. On updates, DynamoDb will create a new Item if the provided Item does not exist. This is not what we want for our use case. If the condition check fails, an exception should be thrown. We will handle more exceptions later on.
Apply the changes, and testing updates should work fine now.
DeletePost
Moving on to DeletePost intent. This should be an easy one. Add the highlighted logic and apply your changes by running terraform apply.
'use strict';

// ...
const DELETE_POST_INTENT = 'DeletePost'

// ...

async function deletePost(intentRequest) {
    const slots = intentRequest.currentIntent.slots;
    let params = {
        TableName: TABLE_NAME,
        Key: {
            PostId: slots.PostId
        },
    };

    return await dynamodb
        .delete(params)
        .promise();
}

// --------------- Events -----------------------
async function dispatch(intentRequest, context, callback) {
    // ...
    switch (intentName) {
        // ...
        case DELETE_POST_INTENT:
            responseContent = await deletePost(intentRequest);
            break;
        default:
            throw new Error(`Intent with name ${intentName} not supported`);
    }
}